


How to Set Up SQL Accounting Software (2025 Guide)
A step-by-step tutorial for beginners to configure and launch SQL Accounting Software for business use – updated for 2025.

Published 04 July 2025
In this article, you will learn about
1. System Requirements & Preparation
2. Installing SQL Accounting Software
3. Creating a New Company Profile
4. Setting Up Core Accounting Structure
5. Configuring Inventory (Optional)
6. Inputting Opening Balances
7. Daily Operations Overview
8. Maintenance Tips & Best Practices
In this article, you will learn about
1. Initial Software Installation and Setup
2. Creating a New Company Profile (Account Book)
3. Configuring Financial Year and Accounting Periods
4. Creating and Customizing the Chart of Accounts
5. Adding Customers (Debtors) and Suppliers (Creditors)
6. Setting Up Tax Codes (SST 2025 Compliance)
7. Overview of Sales and Purchase Workflows
8. Generating Basic Financial Reports (P&L and Balance Sheet)
AutoCount Accounting is a popular Malaysian accounting software designed for SMEs, offering SST compliance and robust features tailored to local business needs. If you're a Malaysian business owner new to AutoCount in 2025, this tutorial will guide you through the foundational setup from installing the software to generating basic Profit & Loss reports. We focus on basic modules and compliance steps relevant to Malaysia (e.g. SST 2025), presented in a clear, step-by-step format. By the end of this guide, you'll have your company’s accounts up and running in AutoCount, with all the key components properly configured.
Installing AutoCount Accounting (Initial Setup)
Before you can use AutoCount, you’ll need to install the software on your PC or server. AutoCount supports both standalone installations (for a single PC) and network installations (for multi-user access). The installer will set up a Microsoft SQL Server database engine for you if one isn’t already present. Here’s how to get started:
1. Obtain the Software: Download the AutoCount Accounting installer from the official AutoCount website or obtain it from an authorized dealer. Ensure you have the latest version (2025) for SST compliance and updates. (Note: As of 2025, AutoCount Accounting 2.2+ is available, which is e-invoice ready and includes up-to-date tax features.) You can also request a free trial if you want to evaluate the software
2. Check System Requirements: AutoCount is a Windows-based application and uses an SQL database. For Windows 10/11, a minimum of SQL Server 2012/2014 or higher is recommended for optimal. The installer typically bundles SQL Server Express (free edition) if you don’t have a database server.
3. Run the Installer: Launch the installer (right-click and Run as Administrator). You will be prompted to choose an installation type:
• Standalone Installation: Installs both the AutoCount program and the database engine on your PC (use this for a single-user setup).
• Server Installation: Installs only the database server component. Choose this on a central server if you have multiple users. (The installer may ask you to specify or install an SQL Server instance; by default it creates an instance named A2006 or similiar.)
• Client Installation: Installs only the AutoCount client program on a workstation, without a database. Use this for additional user PCs that will connect to the central.
For most small businesses, selecting Standalone will be simplest (it covers both program and database in one go). For multi-user setups, install the Database Server on your server PC first, then run the Client Installation on each user’s PC and connect them to the server’s database.
4. Follow the Setup Wizard: The installer wizard will guide you through the process. Accept the license agreement, choose an installation directory, and proceed with default options if unsure. If prompted for SQL settings, you can usually allow the installer to use default SA password and default instance (unless your IT policy requires otherwise). After installation, click Finish.
5. Launch AutoCount Accounting: Double-click the AutoCount icon to start the application. The first time you run it, you may be asked to select a product edition or enter a license key. For a newly purchased license, enter your key as provided. If you’re using a trial, select the trial/default edition to continue.
Tip: If installing for multiple users, ensure all PCs are on the same network and can communicate with the server. You might need to configure firewall settings to allow SQL Server access. For a standalone setup, everything runs locally so you can ignore network settings. AutoCount’s installation will automatically install Microsoft SQL Server Express if no database is detected, simplifying setup for non-technical users.
After installation, you’re ready to create your company database (known as an Account Book in AutoCount). We’ll cover that next.

Creating a New Company Profile (Account Book)
In AutoCount, each company’s accounts are stored in a separate Account Book (database). You’ll need to create an account book for your business, which includes your company’s profile information. AutoCount provides a wizard to guide you through this creation process.
Steps to create a new company account book:
Open the Create Account Book Wizard: In AutoCount, go to File > Manage Account Book, then click on Create Account Book. This will launch the New Account Book Wizard.
Step 1 - Basic Information: Enter your Company Name (this will appear on reports and invoices). The system will suggest a Database Name (e.g., prefix “AED_” plus your company name) – you can accept this default or change it. Also choose the Database Folder where data will be stored (default is usually C:\AutoCount Data). If you're on a network, you can choose to create the account book on a server PC by specifying the server name; for a single PC, leave it as Create on this PC (standalone). If prompted, confirm the SQL server connection (the “Test Connection” button can verify connectivity to the database server)
Step 2 - Fiscal Year Start & Currency: Specify your Fiscal Year Start Date (the beginning of your financial year) and the Actual Data Start Date. For example, if your financial year runs from January to December, you might set Start Date to 01/01/2025. The Actual Data Start Date can be the same as the fiscal start if you’re starting fresh; it’s used if you are beginning mid-year and only want to input data from a certain month. Next, set your Country to “Malaysia” and ensure the Local Currency is “RM” (Ringgit Malaysia) with the correct symbol and currency format. AutoCount will pre-fill “RM” and “MYR – Ringgit Malaysia” if you chose Malaysia as country.
• Note: There may be an option to enable Goods & Services Tax (GST) or Sales Tax in this step (in older versions this was labeled GST Settings). Since Malaysia currently uses SST (Sales & Service Tax), you might not need to check anything here during company creation. We will configure SST tax codes later in detail.
Step 3 - Select Modules: Choose the modules for your account book. By default, the Accounting Package (General Ledger, Accounts Receivable, Accounts Payable) is included. You may also have options like Stock Control (for inventory, sales, and purchase modules) or Invoicing Package (sales module only). For a full accounting system with sales and purchases, select the modules that fit your license. Most SMEs will enable G/L, A/R, A/P, Sales, and Purchase modules for a complete solution.
Step 4 - Chart of Accounts Template: AutoCount can preload a sample Chart of Accounts for you. In this step, you can choose a template (e.g. Trading company or Manufacturing company chart of accounts). For most businesses, selecting “Trading” is a good generic start. The wizard will list an option “Create sample Chart of Accounts” – leave this ticked to have the default accounts created. (If you prefer to build your chart of accounts from scratch, you can untick it to create a blank set, but this is not recommended for beginners.) You can always modify the accounts later, but using the sample gives you a standard Malaysian-friendly account structure out of the box.
Finish: The wizard will create the database. You should see a confirmation “Account book is created successfully.” Click OK, then Exit and re-open AutoCount. Upon re-opening, you’ll see your new company listed; select it and log in. The default login user is Admin with no password (you can set a password later for security).
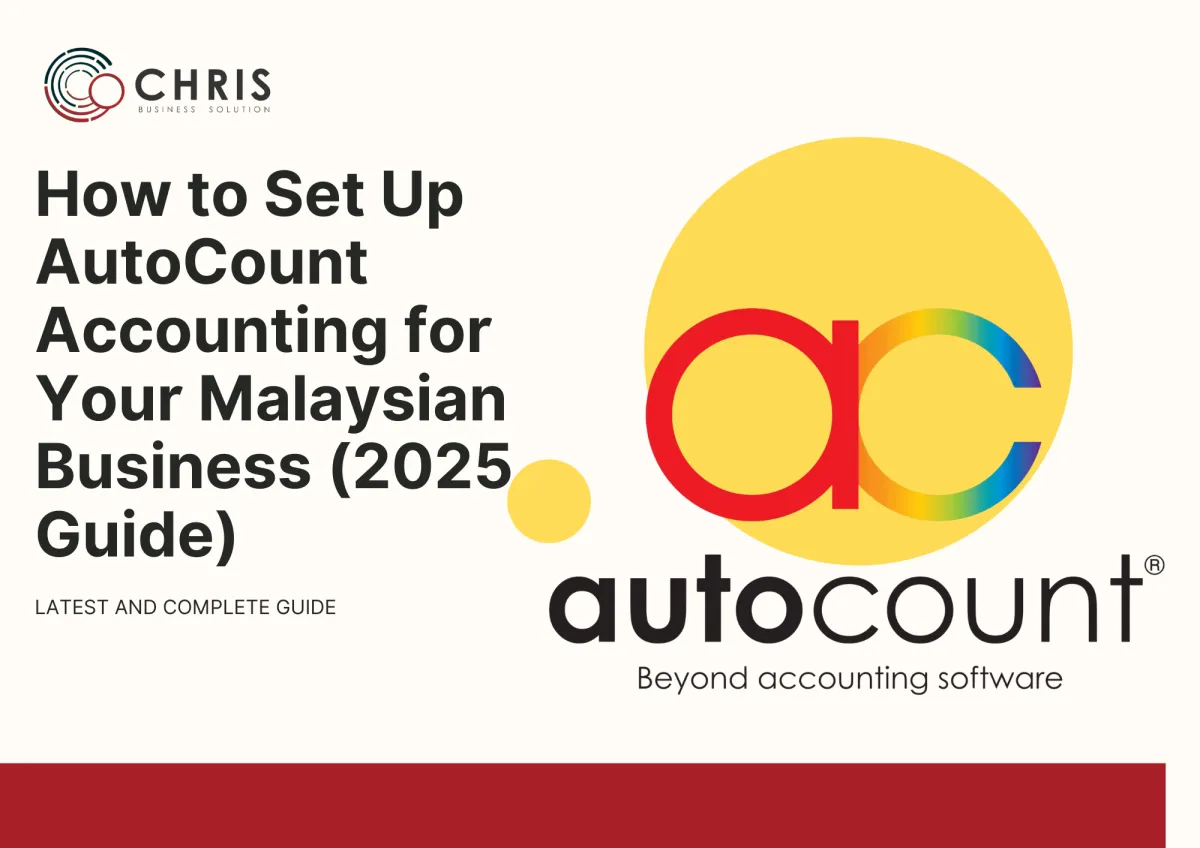
Company Profile Details: Now that the account book is created, update your Company Profile with address and registration details. Go to General Maintenance > Company Profile. Fill in your company’s registered address, phone, email, business registration number (SSM) and other info. These details will appear on invoices and reports (for example, the #Company tag in report headers will use this data). Click OK to save. Tip: You can also upload your company logo here or in report settings, so it prints on invoice headers.
Setting Financial Year and Accounting Periods
Properly defining your financial year in AutoCount is crucial, as you must set the fiscal year before entering any transactions. When you created the account book, the system likely created an initial fiscal year based on the start date you provided. However, you should verify and adjust your financial year and periods as needed:
• Manage Fiscal Year: Go to Tools > Manage Fiscal Year in the menu. In the Manage Fiscal Year window, you will see the list of financial years for your company. For a new company, you might see one fiscal year (e.g. “Fiscal Year 2025”) created by default, spanning the start and end dates you provided (e.g. 01/01/2025 to 31/12/2025).
• Verify or Edit Year Dates: Ensure the Start Date and End Date of the fiscal year match your intended accounting period (some companies in Malaysia might use a non-calendar fiscal year, e.g. July to June, so adjust if necessary). If no transactions have been entered yet, you can edit the dates freely. For instance, if your business fiscal year is July 1 to June 30, you could edit Fiscal Year 2025 to start on 01/07/2025 and end on 30/06/2026. (AutoCount names the fiscal year by the start year by default.)
• Active Year: The fiscal year screen will have an Active checkbox or indicator – make sure the current year is marked as active. This tells the system which year you are working in for transactions.
• Creating Additional Years: You can create prior or future years if needed. For example, to enter comparative data or to prepare for the next year, use New Previous Fiscal Year or New Next Fiscal Year button. AutoCount allows you to maintain multiple years and will link the opening balances and comparative figures for P&L and Balance Sheet automatically if consecutive years exists.
• Periods and Locking: AutoCount divides the fiscal year into monthly periods. You have options to lock periods to prevent backdated changes. For instance, after you finalize accounts for a month or quarter, you can lock that period so no transactions can be added or edited in that time frames. In the Manage Fiscal Year screen, look for Manage Period Lock to set this up once you begin processing transactions. This is a good internal control to avoid accidental edits to past data.
For a new setup, simply confirm the fiscal year spans the correct dates (e.g., January–December for most Malaysian companies, or your custom year if applicable). Setting this correctly ensures reports like Profit & Loss and comparisons work properly.
Now that the fiscal year is in place, let’s configure the Chart of Accounts, which is the backbone of your accounting records.
Creating and Customizing the Chart of Accounts
The Chart of Accounts (COA) is a structured list of all accounts used to record your business transactions – assets, liabilities, equity, revenue, and expenses. AutoCount comes with a predefined COA if you opted to create sample accounts during the new account book setup. This default chart is aligned with typical Malaysian SME accounting needs (for example, it likely includes Cash/Bank accounts, Trade Debtors, Trade Creditors, Sales Income, Purchase Cost, various Expenses, Tax accounts, etc.).
Understanding the COA Structure: AutoCount organizes accounts into two main sections:
• Balance Sheet Accounts: These track what your company owns and owes, and its net worth. This includes Assets (e.g. Bank, Petty Cash, Accounts Receivable), Liabilities (e.g. Accounts Payable, Loans), and Equity (Capital, Retained Earnings). For example, Fixed Assets represent long-term assets like equipment, Current Assets represent short-term assets like cash or inventory, Current Liabilities for short-term debts, etc.
• Profit & Loss Accounts: These track income and expenses that determine your profit for the period. E.g., Revenue accounts for sales income, Cost of Sales for cost of goods sold, and various Expense accounts for operating costs (rent, salaries, utilities, etc.). Businesses often create separate accounts for each major type of income or expense (e.g., Sales – Product A, Sales – Service, Rent Expense, Utilities Expense and so on) to track them in detail.
AutoCount’s sample chart follows a common numbering convention and category grouping. For instance, asset accounts might start with 1XXX, liabilities 2XXX, equity 3XXX, revenue 4XXX, expenses 5XXX and above (this is a typical structure, though the exact numbers may vary in the sample provided).
Viewing and Editing the Chart of Accounts:
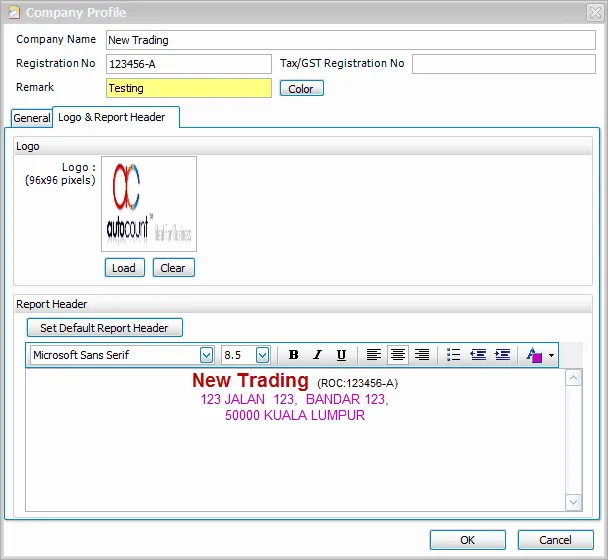
To access the COA, go to General Ledger (G/L) > Account Maintenance (sometimes called Account Code Maintenance) in AutoCount. Here you will see the list of accounts and their details. By default, all accounts are shown; you can filter by account type if needed (assets, expenses, etc.)
Key operations you can perform in Account Maintenance:
• Add a New Account: Click the New Account button. AutoCount will ask what type of account you want to create. For example, choose New Normal Account for a regular expense or income account. If you need to create a specialized account like a new bank account, there are specific options (e.g. “Bank/Cash” account type) that automatically classify it correctly. Similarly, you can create new Fixed Asset accounts or other types using the provided buttons (e.g., Fixed Asset, Debtor Control, Creditor Control, etc.).
• When adding an account, you’ll provide an Account Code (number) and a Description (name). The numbering should fit into the hierarchy. For example, to add a new expense account “Marketing Expense,” you might assign it a number in the 5xxx range along with the other expenses. The system can auto-generate a number if you click the '+' next to the code field, following the format set in Tools > Options > Account Code Format (e.g., 3 digits for main and 4 digits for sub-accounts).
• You can also set a parent-child hierarchy for accounts if needed. For instance, you might have a parent account “Fixed Assets” and child accounts under it for “Office Equipment”, “Vehicles” etc. AutoCount supports grouping accounts in this way (the sample COA often includes parent accounts like Fixed Assets with sub-accounts for each asset category). Creating a parent account is done by adding a normal account at the parent level, then adding child accounts and assigning the parent as their group.
• Edit an Account: To rename or reclassify an account, select it and click Edit. You can change the Description (e.g., correct a spelling or rename “Misc Expense” to “Miscellaneous Expenses”). However, you cannot change an account’s fundamental type (asset, expense, etc.) once transactions are recorded, and you cannot delete an account that has any transaction history. If an account is not used and you want to remove it, you can delete it – but for the default ones, it’s usually best to simply leave them or deactivate if possible.
• Control Accounts: Notice that certain accounts are flagged as Control Account – for example, Trade Debtors (Accounts Receivable control) or Trade Creditors (Accounts Payable control). These are special accounts that aggregate the balances of individual customers or suppliers. The default chart includes these (often labeled something like “300/0000 Trade Debtor” and “500/0000 Trade Creditor”, numbers may vary). Keep these in the chart, as they will be needed when you create customer and supplier records. AutoCount will post summary receivable and payable balances to these control accounts automatically. (If you have multiple receivables accounts – e.g., domestic vs overseas debtors – you can create additional control accounts, but that’s beyond basic scope. Most SMEs use a single debtor and single creditor control account.)
• Retained Earnings: The chart must have a Retained Earnings or Accumulated Profit/Loss account (equity) where prior years’ profits are carried forward. AutoCount only allows one such account in the chart. The sample COA will have one (often named “Retained Earnings”). Ensure you keep this account, as the year-end process uses it.
• Printing the COA: You can click Print Chart of Accounts to get a printed list of all accounts for review, which is useful for documentation or checking with your accountant.
Customizing Tips: Initially, the sample COA may suffice, but you should review it and customize to your business:
• Add accounts for any unique revenue streams or expenses you want to track separately.
• Remove or hide accounts that don’t apply to you (for example, if you don’t have “Commission Income” in your business, you can repurpose that account for something else or just leave it unused).
• Ensure tax-related accounts exist (for SST, typically an account for Sales Tax Payable and Service Tax Payable under liabilities – the sample likely includes these). We will discuss SST configuration next.
With your Chart of Accounts in place, you can now set up customers and suppliers, which AutoCount calls Debtors and Creditors.
Adding Customers (Debtors) and Suppliers (Creditors)
Setting up your Customer and Supplier lists is an important step so that you can issue invoices and track payables. In AutoCount, customers are managed under Accounts Receivable (A/R) as Debtors, and suppliers under Accounts Payable (A/P) as Creditors. Let’s go through adding a new customer profile (debtor), and similarly a supplier (creditor):
Adding a Customer (Debtor):
1. Open Debtor Maintenance: Go to A/R > Debtor Maintenance from the top menu. A list of existing debtors (if any) will be shown. For a new account book, this list may be empty or contain only a generic sample customer.
2. Create New Debtor: Click the Create New Debtor button (or + New depending on the interface). This opens the Debtor maintenance form where you can enter the customer details.
3. General Info: On the General tab of the Debtor form, fill in the following key fields:
• Company Name: The name of your customer’s company (or individual’s name, if it's an individual). Example: ABC Sdn Bhd.
• Registration No.: (Optional) The customer’s business registration number (e.g., the ROC/SSM number in Malaysia). This can be useful for your records, especially if they are GST/SST registered entities.
• Debtor Account Code: This is a unique code/ID for the customer account in your system. You can click the “+” button to auto-generate the next available code, or assign one manually. Many users let AutoCount generate a sequential code like CUST0001, CUST0002, etc., or use abbreviations of the company name.
• Debtor Type: (Optional) You can categorize customers by type (like Retail, Wholesale, Government, etc.) for reporting. Debtor Types can be maintained via General Maintenance > Debtor Type if you want to use this, but it's optional.
• Control Account: Choose the Accounts Receivable control account that this debtor will roll up to. Typically, you will select your main Trade Debtors account (the default one created in the COA). This links the customer’s transactions to the general ledger. Note: If you have multiple debtor control accounts (rare for basic setups), pick the appropriate one. Otherwise, the default “Trade Debtor” account is used for all customers.
4. Contact Details: Still on the General tab, you can enter the Billing Address (the customer’s address for invoices) and Delivery Address if different. Also fill in contact fields like Email, phone, etc., as needed. There are fields for Attention (contact person name) and Business Nature (industry of the customer) – these are optional but can be filled for completeness.
• If you have the multi-currency module enabled and this customer will be billed in a foreign currency, you can set their Currency here (otherwise it defaults to RM).
5. Credit Terms and Limits: On the same screen or a related tab, set the Credit Term for this customer (e.g. 30 days, 60 days) which you have defined in Credit Term maintenance. Also, you can assign a Credit Limit if you want to cap how much credit this customer can have. AutoCount has a Credit Control feature which can warn or block transactions if the customer is overdue or over limit – for a basic setup you might leave it as “No Block” or simply monitor manually. These fields help you manage collections by flagging overdues.
6. Save: Click OK/Save to add the customer to the system. If you have more customers, you can continue creating new records.
Adding a Supplier (Creditor):
The process for suppliers is very similar, but via the A/P module:
1. Go to A/P > Creditor Maintenance.
2. Click New Creditor to add a supplier.
3. Fill in Company Name, Registration No. (their business reg number, if any), and let the system auto-assign a Creditor Account Code (or enter one).
4. Control Account: Select the Accounts Payable control account (e.g., Trade Creditors). The default COA should have one; use that unless you segregate creditors.
5. Enter the supplier’s address and contact info similar to the debtor. You may also specify default Credit Terms (e.g., if the supplier gives you 30 days to pay) and a credit limit if you want to monitor how much you owe them.
6. Save the supplier record.
You now have your key business partners set up. These records will be used when you create Invoices, Bills, Credit Notes, Payments, etc. For example, when issuing a sales invoice, you’ll select the Debtor from this list; when entering a supplier bill, you’ll select the Creditor.
Malaysian Context Tip: In the debtor/creditor profile, there are fields for Tax information. If your customer or supplier is SST-registered, you might want to record their Tax Registration Number (SST ID) in their profile and possibly a default tax code. For instance, if a customer is SST-registered and you mostly sell them taxable goods, you might set a default tax code on their profile (however, in SST this is less common than GST to set per customer, since SST is usually on goods/services rather than the customer's status – except for exemption cases). There is also a field for Sales Tax Exemption No. for customers who have an exemption certificate. Use this if applicable (for example, certain manufacturing customers might give you an exemption certificate so you don’t charge sales tax on components – you would record that number here).
With customers and suppliers in place, you can start entering sales and purchase transactions. But before we jump into workflow, let's ensure your tax codes are configured for Malaysia’s SST in 2025.
Setting Up Tax Codes (SST 2025 Compliance)
Tax configuration is a critical step for Malaysian businesses. Malaysia’s current indirect tax system is SST (Sales and Service Tax), reintroduced in 2018. As of 2025, the SST is still in effect (with Sales Tax on goods and Service Tax on services). AutoCount Accounting is SST-compliant, meaning it can handle multiple tax codes and generate SST reports to aid your submission. We need to set up the correct tax codes in AutoCount for proper tax calculations on invoices and purchases.
Enable SST in Company Settings: First, ensure that SST is turned on in your company settings. In AutoCount, go to Tools > Options > Country and Tax. There should be an option to Enable Sales and Service Tax (SST) – check this option if it isn’t already checked. This ensures all SST-related features (tax code maintenance, SST reporting) are active for your account book.
Configure Malaysia SST Tax Codes: AutoCount provides a convenient wizard to set up standard SST codes. Here’s how to use it:
1. Go to Tax > Tax Code Maintenance on the top menu. This opens the list of tax codes. Out of the box, you might see some default codes (especially if you created the account with Malaysia as country).
2. Click Configure Malaysia SST (sometimes found as a button in the Tax Code Maintenance screen). This brings up an SST configuration dialog with a predefined list of Malaysian tax codes.
3. Select Tax Codes to Enable: In the configurator, you will see tabs for Input Tax and Output Tax codes. SST is different from GST; under SST:
• Sales Tax (on goods) is typically an output tax for manufacturers (and input tax for importers). Common sales tax codes include S-5 (Sales Tax 5%), S-10 (Sales Tax 10%), etc.
• Service Tax (on services) is typically output tax for service providers. The standard service tax was 6%, now changed to 8% effective 1 March 2024. Codes for service tax include SV-8 (Service Tax 8% output) and previously SV-6 for 6%. There are also codes for service tax on credit notes, imported services, etc. AutoCount added 8 new tax codes to accommodate the change to 8%. Examples: SV-8 (service tax 8%), SVI-8 (maybe service tax input for imported services), IMSV-8 (imported service tax 8%), etc., as listed in the configurator.
• You will also see Purchase/Supply exemption codes like ESV-8, DS-8 (specific use cases for designated areas or special schemes) – those are advanced, select them if relevant to your business.
In the configurator dialog, tick the tax codes that you need for your business on both Input and Output tabs, then click Save. For example, a typical trading company selling goods might enable S-5 or S-10 (depending on what rate their goods are taxed, if they are a manufacturer or importer) and perhaps SV-8 if they also provide a taxable service. A service business would enable SV-8. If you’re unsure, consult with your accountant or refer to the Customs SST guide for which SST categories apply to you.
(If your business only purchases and doesn’t charge any SST – e.g., a trading company that is not a manufacturer (hence doesn’t charge sales tax) nor a service provider – you might not need to enable any output tax code, but you might still encounter input SST on your purchases. However, under SST, input tax credit is not broadly claimable like GST was; sales tax paid on inputs might be claimable in specific manufacturing contexts (credit system or exemptions) and service tax on certain imported services has a reverse charge. So enable codes that you need to report.)
4. Verify Tax Codes List: After saving, your Tax Code Maintenance list will be populated with the selected SST codes. For each code, AutoCount knows the tax rate (5%, 6%, 8%, 10%, etc.) and whether it’s sales or service tax. For example, you should now see SV-8 with 8% rate in the list. Ensure the effective date for SV-8 is set (AutoCount will not allow using SV-8 for dates before 1/3/2024) – in fact, if you try to use the new 8% code on a backdated invoice, the system will block it to prevent mistakes. This is a useful feature to keep you compliant.
5. Assign GL Accounts: Each tax code in AutoCount is linked to specific GL accounts for posting tax amounts. Typically, output tax codes (sales tax or service tax you charge) map to a Tax Payable liability account, and input tax codes (tax you pay on purchases) could map to a purchase tax expense or similar. The standard chart of accounts likely includes an account like SST Output Tax Payable. Check the Tax Code Maintenance to ensure the Output SST codes are assigned to the SST payable account, so that when you generate the SST-02 report, it pulls the right figures. (AutoCount often handles this automatically when using the configurator, but it’s good to verify).
6. Default Tax Code Settings (Optional): You can set default tax codes for certain transactions:
• If most of your sales are taxable with SST, you might set a default output tax code in Stock Item or Service Item records (e.g., set each item’s tax code to S-10 or SV-8 as appropriate). Then when you invoice that item, the tax code auto applies.
• You can also assign a default tax code to customers or suppliers in their maintenance screen under an “Others” or “Tax” tab (for example, if a supplier always charges you 5% sales tax on certain goods, you could set a default input tax code for transactions with that supplier). AutoCount’s logical.asia wiki suggests how to set a default tax code on a debtor/creditor for service tax if needed. However, for simplicity, many users just select the tax code on each invoice line manually or via the item’s default.
Now your system is SST-ready. AutoCount will calculate tax on your invoices and purchases based on these codes and rates. The software can also generate the SST-02 report and related tax reports when needed (via the SST module/Tax Reports menu), but that’s beyond our basic setup scope. The key is that your transactions will now correctly distinguish taxable and non-taxable amounts in compliance with 2025 SST rules.
Example: If you issue a service invoice of RM1,000 in April 2025, selecting tax code SV-8, AutoCount will compute 8% service tax = RM80. The invoice will show RM1,080 total (RM1,000 + RM80 tax), and the RM80 is accrued to your “Service Tax Payable” account. At period end, you can easily get the total tax to declare to Customs from the system.
Before generating financial reports, let’s do a quick overview of how you’ll typically use AutoCount for sales and purchase transactions on a daily basis.
Overview of Sales and Purchase Workflows
AutoCount Accounting covers the full cycle of sales and purchases – from quotation to invoicing for sales, and from purchase order to supplier invoice for purchases. As a new user, it’s important to understand the basic workflow in each area. Here’s a brief overview:
Sales Workflow Basics
A typical sales process in AutoCount can involve several documents, depending on your business needs:
• Quotation → Sales Order → Invoice → Delivery Order → Payment Receipt
All these steps are optional except the Invoice, which is the actual sales billing document that records revenue and receivable. Many SMEs streamline the process and go straight to Invoice for simplicity, but AutoCount allows the full workflow if needed.
Key sales documents in AutoCount (and how to use them):
• Quotation: A non-posting document to propose prices to a customer. If the customer confirms, you can convert the quotation into a Sales Order.
• Sales Order (SO): Represents a confirmed order from a customer. It can reserve stock (if you track inventory) and plan delivery. You can skip directly to Invoice if you don’t need order management.
• Delivery Order (DO): Used when delivering goods before invoicing (common in trading/manufacturing). It records the item delivery and can be converted into an invoice later. If you invoice immediately upon delivery, you might not use separate DOs.
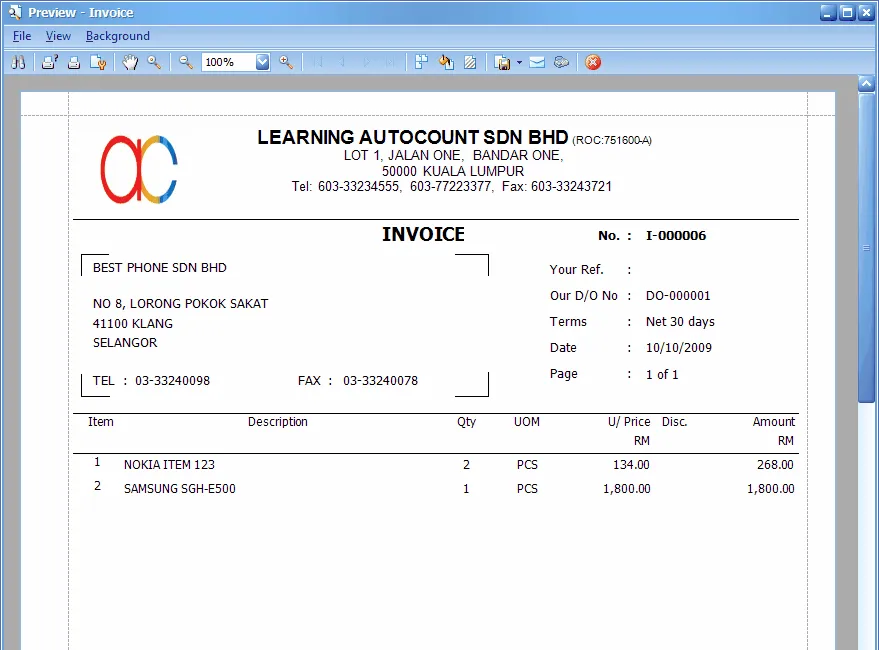
• Invoice: The Sales Invoice is the crucial document that records the sale in the accounts. In AutoCount, you create an invoice by going to Sales > Invoice (or sometimes via A/R module). Choose the Debtor (customer) from the list, enter the invoice date and any reference, then add line items for products or services sold. Each line will have an item, description, quantity, unit price, and a tax code (AutoCount will apply the SST tax if a taxable code is chosen). The system will calculate the total, including tax. Save the invoice – this will debit the customer’s account (in Trade Debtors control) and credit the sales revenue (and credit tax payable for the SST portion) automatically in the background.
• Cash Sale: If you have a sale that is paid immediately (cash or credit card) and you want to issue a simplified invoice/receipt, AutoCount has a Cash Sale document which is essentially an invoice + payment in one. This is useful for retail scenarios.
• Receive Payment: When the customer pays (for a credit sale), you'll go to A/R > Receive Payment to record the collection. You select the customer, input the amount received, and knock it against the outstanding invoice. This will credit the customer (reducing accounts receivable) and debit your bank or cash account.
For a beginner, the simplest approach is: create a Sales Invoice for each sale and if paid immediately, mark it as cash; if not, later record a Receive Payment. You can bypass quotations and SOs unless your process needs them. AutoCount’s sales module is integrated, so you can always start with an invoice or use the convert feature: e.g. convert SO to DO, DO to Invoice with a few clicks, without re-keying data.
(For reference, AutoCount’s menu might list these as “Sales > Quotation, Sales > Sales Order, Sales > Delivery Order, Sales > Invoice, Sales > Cash Sale” etc., reflecting the full workflow options)
Purchase Workflow Basics
On the purchase side (procurement from suppliers), the documents mirror the sales side:
Purchase Requisition → Purchase Order → Goods Received Note (GRN) → Purchase Invoice (Bill) → Payment
Again, you can simplify if you don’t need all steps. Many businesses directly enter supplier invoices (bills) without POs or GRNs, unless they need to manage orders and stock receipts explicitly.
Key purchase documents:
• Purchase Order (PO): You can issue POs to order goods/services from suppliers. It’s an optional step to formally record an order.
• Goods Received Note (GRN): When goods arrive, a store/warehouse can record a GRN to note the receipt of items (updating inventory on hand). GRNs can later be matched with the supplier’s invoice.
• Purchase Invoice: This is the supplier’s bill – in AutoCount often called A/P Invoice or Purchase Invoice. To enter a bill from a supplier, go to Purchase > Purchase Invoice (or A/P module). Select the Creditor (supplier), date, supplier invoice reference, and enter the items or expense details being billed. Apply the appropriate tax code on each line (e.g., if the supplier charged you SST, use the matching input tax code like S-10 for 10% Sales Tax on purchases, or perhaps IMSV-8 if it’s an imported service subject to service tax reverse charge). AutoCount will calculate the tax portion. Save the purchase invoice to record it. This will debit your expense or inventory accounts and debit any tax paid (or a tax expense account), and credit the supplier’s account (under Trade Creditors) for the total amount you owe.
• Cash Purchase: If you immediately paid for something (like a cash purchase at a shop), AutoCount can record it via a Cash Purchase document (similar to Cash Sale concept). But you can also just enter it as a normal purchase invoice and then record an immediate payment.
• Payment to Supplier: To record paying a supplier, use A/P > Payment (sometimes called Pay Bill in layman terms). Select the supplier, input the payment details (date, amount, bank account used to pay), and knock off the outstanding purchase invoice. This credits your bank (money out) and debits the creditor (reducing accounts payable).
(AutoCount’s purchase menu typically includes “Purchase > Purchase Order, Purchase > Goods Received Note, Purchase > Purchase Invoice, Purchase > Cash Purchase, Purchase > Purchase Return” etc.)
Stock Considerations: If you are dealing with inventory items, AutoCount’s Sales and Purchase modules will automatically adjust stock levels when using Delivery Orders, GRNs, Invoices, etc., as long as those items are set up in the Stock Item list. For a basic accounting usage, you might not manage inventory in detail initially, but be aware the system can handle it. For example, a Delivery Order will reduce inventory of the items delivered, and a Goods Received Note will increase inventory on hand. If you are not ready to manage inventory, you can also just use generic accounts for cost of sales and purchase without item-by-item tracking.
In summary, AutoCount’s workflow is flexible. You can use as many or as few steps as needed. For a start, focus on creating Invoices for sales and Purchase Invoices for expenses, as these are the documents that affect your financials. As you grow comfortable, you can incorporate Quotations, Orders, DOs, GRNs, and so forth into your process for better management.
Now, with transactions flowing, you’ll want to see how your business is doing. AutoCount provides a range of reports. We’ll look at the two most important financial statements next.
Generating Basic Financial Reports (P&L and Balance Sheet)
One of the great benefits of using AutoCount is the ease of generating financial reports anytime. With your accounts set up and transactions entered, you can produce a Profit & Loss Statement and Balance Sheet instantly, which are essential for monitoring your business performance and financial position.
Here’s how to generate these reports in AutoCount Accounting:
• Profit & Loss Statement (Income Statement): This report shows your income, expenses, and net profit for a period.
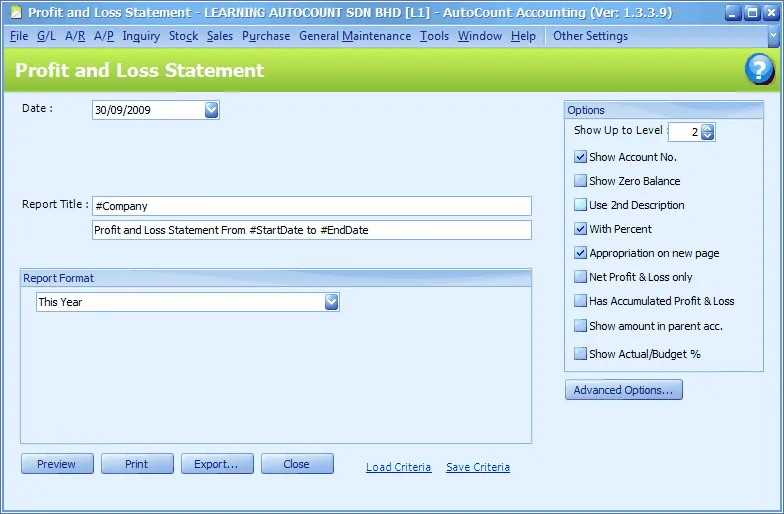
1. Navigate to G/L > Profit and Loss Statement in the AutoCount menuautocountsoft.com. A report dialog will appear.
2. Select the Date Range or period. For example, to see the P&L for January 2025, you might set From 01/01/2025 to 31/01/2025. Often, you just need to set the end date (e.g., “As of” date) and the system will use the start of the fiscal year to that date by default, unless you specify otherwise.
3. The Report Title can be customized, but it usually auto-fills as “Profit and Loss Statement” with your company name and the date range.
4. Choose a Format if multiple formats are available (e.g., compare with budget, month-by-month, etc.). The standard format will list revenues, then expenses, then net profit.
5. Click Preview or Print. AutoCount will generate the P&L. You’ll see all your revenue accounts totaled, all expense accounts totaled, and the resulting Net Profit (or Loss) for the period. Because we set up the chart of accounts properly, the system knows which accounts are revenue vs expense and will format accordingly. If you see any accounts mis-classified, you may need to check that they have the correct account type (e.g., if an expense is showing in the revenue section, its type might have been set wrong).
6. You can toggle options like “Show Account Number” or “Show Zero Balance” to include accounts with no activity. For a clean report to management, you might hide zero-balance accounts.
7. You can also generate for the full year-to-date or any custom range. For SST filing or management, monthly P&Ls are common.
AutoCount even allows drill-down on reports – for example, in the preview, if you click on a figure, it will show the detailed transactions contributing to that number. This is handy for auditing a specific expense or revenue line.
• Balance Sheet: This report shows assets, liabilities, and equity at a point in time (usually end of month or year).
1. Go to G/L > Balance Sheet Statement.
2. Choose the As of Date (e.g., 31/03/2025 for a quarterly balance sheet, or 31/12/2025 for year-end).
3. The Balance Sheet will display with assets on one side and liabilities & equity on the other. It follows the accounting equation (Assets = Liabilities + Equity). AutoCount’s format typically lists Current Assets, Fixed Assets, then Current Liabilities, Long-term Liabilities, and Equity.
4. Ensure that the Retained Earnings account shows the brought forward profits correctly – the system does this automatically based on prior year P&L if you closed the year or entered opening balances.
5. As with P&L, you can preview/print and drill down into balances. If something doesn’t balance, it means some accounts might not be in the correct category or there is a data entry issue (the software itself ensures double-entry, so imbalance is rare unless accounts were mis-categorized).
6. You have options to show multi-level detail (e.g., if you have sub-accounts) or collapse to summary levels.
• Other Reports: In addition to these, AutoCount can generate a Trial Balance, General Ledger Detail, Debtor/Creditor Aging reports, Sales analysis, etc. For example, a Trial Balance can be obtained via G/L > Trial Balance, and Debtor Aging via A/R reports. Since our focus is basics, remember that P&L and Balance Sheet are your primary financial statements:
1. P&L (Profit & Loss) tells you if you’re making money over a period.
2. Balance Sheet tells you the net worth of your business at a point in time.
AutoCount’s reporting module is quite robust. You can even customize report layouts or export them to Excel for further analysis. The system ensures that all entries you’ve made (invoices, payments, etc.) flow to these reports automatically in real-time. For instance, the moment you save an invoice, that revenue is reflected in P&L and the debtor balance is in the Balance Sheet.
Pro Tip: Utilize the financial year comparison feature if you have more than one year in the system. AutoCount can show current vs previous year figures side by side in the P&L or Balance Sheet (by selecting comparative format or multi-period format) – useful for seeing growth trends. Also, make sure to review the SST reports in the Tax Reports section when it’s time to file SST; AutoCount can generate the SST-02 form details based on your transactions.
Conclusion & Next Steps
Congratulations! You’ve set up the core components of AutoCount Accounting for your Malaysian business. To recap, we covered how to install the software, create your company database, define the fiscal year, set up your Chart of Accounts, enter your customers and suppliers, configure SST tax codes for 2025 compliance, and understand the basic sales/purchase workflow and report generation. With this foundation, you should be able to start recording daily transactions confidently.
A few final tips for success:
• Regular Backups: Ensure you backup your AutoCount database regularly (AutoCount has a backup function under Tools > Backup) to prevent data loss. It’s good practice to keep copies of your account book backed up weekly or before major postings.
• User Management: If others will use the system, set up user IDs and permissions (via General Maintenance > User Maintenance) so employees only access what they need, keeping sensitive data secure.
• Stay Updated: AutoCount releases updates that include tax changes and improvements. For example, when service tax changed to 8%, a software update delivered those new tax codes. Keep your software updated to the latest version to benefit from new features (such as the upcoming e-Invoicing capabilities mandated by LHDN) and compliance requirements.
• Leverage Support and Training: AutoCount has an online knowledge base and authorized resellers who provide training. If you’re unsure about a feature (like bank reconciliation or SST reporting), don’t hesitate to consult the documentation or get professional training. It can greatly enhance your usage of the system.
• Gradual Expansion: Focus on mastering the basic modules first (GL, AR, AP, simple stock if needed). Later, you can explore other modules that AutoCount offers, such as Inventory management, Payroll (HRMS), Point-of-Sale (POS), or Project accounting, as your business grows. AutoCount is modular and scalable to fit more complex needs when required.
By following this guide, you have performed the essential AutoCount setup for Malaysia. Your accounting system is now tailored for Malaysian regulations (SST), and you can efficiently manage your financial transactions. This solid start will save you time, reduce errors, and provide insights into your business’s financial health.
Happy accounting with AutoCount, and may your Malaysian business thrive in 2025 and beyond!
FAQs
Is AutoCount suitable for small businesses in Malaysia?
Yes. AutoCount is designed with Malaysian SMEs in mind. It supports multi-user environments, SST compliance, and flexible modules including accounting, invoicing, stock control, and POS. Even businesses with no full-time accountant can manage their finances effectively with it.
Can I use AutoCount without any accounting background?
Yes, but with some learning. AutoCount offers a guided interface, and if you follow step-by-step tutorials (like this one), you can start handling invoices, expenses, and reporting with minimal knowledge. However, consulting with an accountant during the initial setup is still advisable.
Is AutoCount SST-compliant in 2025?
Absolutely. AutoCount is regularly updated to follow Malaysia's latest SST requirements. The 2025 version includes support for 8% service tax, proper SST-02 reporting, and automated tax code application. It also prevents common tax errors, like using outdated tax codes for the wrong periods.
Chris Business Solution Sdn Bhd (1118226-W)
© Copyright 2025. Chirs Business Solution Sdn Bhd. All rights reserved.
About
Solutions
Others
Resources
Connect With Us

Address: No. 29-1 & 31-1 & 33-1, Jalan Raja Uda, Pusat Perniagaan Raja Uda, 12300 Butterworth, Pulau Pinang.
Phone: +604 - 313 7197