


How to Set Up SQL Accounting Software (2025 Guide)
A step-by-step tutorial for beginners to configure and launch SQL Accounting Software for business use – updated for 2025.

Published 11 June 2025
In this article, you will learn about
1. System Requirements & Preparation
2. Installing SQL Accounting Software
3. Creating a New Company Profile
4. Setting Up Core Accounting Structure
5. Configuring Inventory (Optional)
6. Inputting Opening Balances
7. Daily Operations Overview
8. Maintenance Tips & Best Practices
In this article, you will learn about
1. System Requirements & Preparation
2. Creating a New Company Database
3. Configure Chart of Accounts
4. Add Users and Set Access Permissions
5. Set Up Customers, Suppliers & Inventory
6. Opening Balances (Optional but Recommended)
7. Final Checklist Before Going Live
8. Final Thoughts
Whether you're a small business owner, accountant, or administrator, getting started with a reliable accounting system is essential. SQL Accounting Software remains one of the most popular choices in Southeast Asia especially in Malaysia, thanks to its multi-user support, GST/SST readiness, and strong modular design.
In this 2025 updated guide, I’ll walk you through how to properly install, set up, and configure SQL Accounting Software, so you can manage your company’s finances with confidence. We’ll cover every key step, with helpful tips for you to follow.
System Requirements & Preparation
Before installing, ensure your system is ready to run SQL Accounting efficiently:
Operating System : Windows 10 / 11 (64-bit)
RAM : 4GB (Recommend 8GB or more)
Hard Disk Space : 10GB Free Space (SSD Recommend)
Database Engine : Firebird 2.5 or SQL Server
Required Files
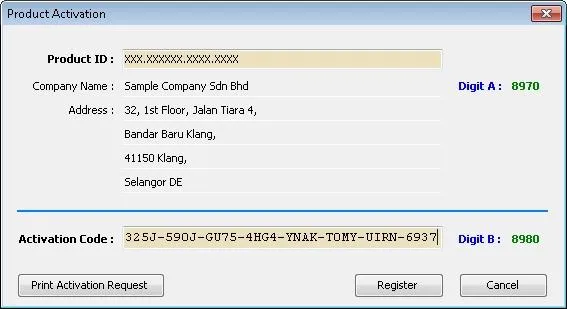
• SQL Accounting Installer (latest version – request from your authorized dealer)
• Serial Key and Activation Code (provided by dealer)
• SQL Server Express (optional for advanced users)
💡 Tip: If you're using this in a multi-user environment, choose one computer to act as your server and install the database there.
Downloading the Software
After obtain the installation package from your SQL dealer, choose your setup type:
• Standalone Installation – for single computer use
• Client-Server Installation – for multi-user environments across a network
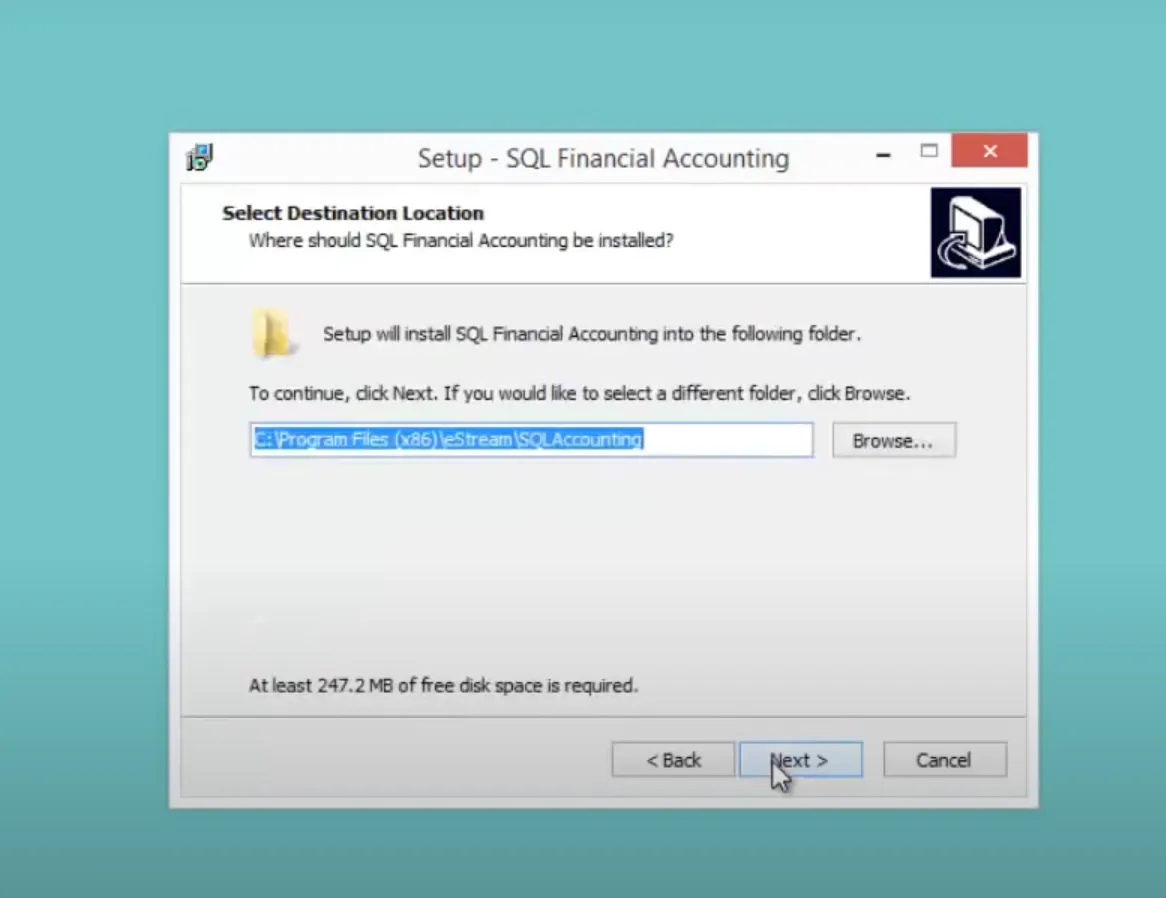
Installation Steps
1. Run the installer as Administrator
2. Choose whether to install SQL Server if you don’t already have it
3. Follow on-screen prompts to complete the installation
4. Launch the SQL Account software after installation
Creating a New Company Database
Open SQL Account
After launching the software, go to:
File > Create New Company
Fill in Company Information
Enter key company details such as:
• Company Name
• Business Registration Number
• Financial Year Start Date
• Default Currency
• Address & Contact Info
⚠️ Tip: Avoid using special characters in the company name or database name to prevent future compatibility issues.
Choose Database Type
• For single-user: save the database locally
• For multi-user: select SQL Server as the backend and configure accordingly
Configure Chart of Accounts
SQL Account provides a default chart of accounts (COA), but you can customize it to suit your business
How to Access COA:
General Ledger > Maintain Chart of Account
Each account is categorized by:
Assets (e.g., Cash, Bank, Inventory)
Liabilities (e.g., Payables, Loans)
Equity (e.g., Retained Earnings)
Revenue (e.g., Sales, Services)
Expenses (e.g., Utilities, Salaries)
🧠 Best Practice: Use a numbering system (e.g., 1xxx for Assets, 2xxx for Liabilities) to keep your chart clean and easy to manage.
Add Users and Set Access Permissions
If multiple team members will be using the system, you’ll need to manage access rights
To Add Users:
General Maintenance > User Maintenance
Steps:
1. Click “New” to add a user
2. Assign a username and password
3. Select their roles (Admin, Sales, Accounts, etc.)
4. Define module-level access for each user
🔒 Why This Matters: Ensures sensitive financial data is only accessed by authorized personnel.
Set Up Customers, Suppliers & Inventory
Now that your base system is ready, you can start populating operational data
Add Customers & Suppliers:
Customer > Maintain Customer
Supplier > Maintain Supplier
Include essential details:
• Company name
• Contact person
• Billing & shipping address
• Payment terms
• Credit limit (optional)
Add Inventory Items:
Stock > Maintain Stock Item
Define:
• Item code & description
• Unit of measure
• Selling & cost price
• Tax code (for SST/GST)
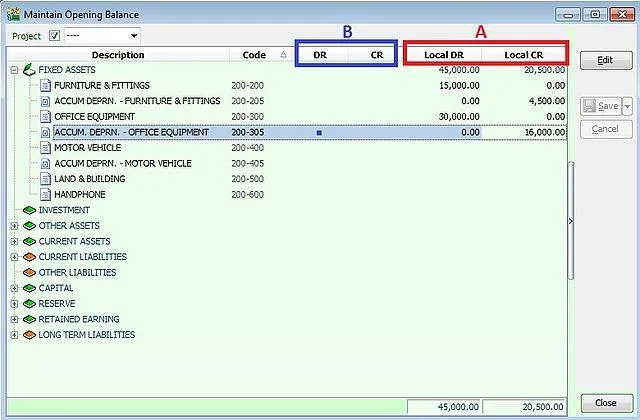
Opening Balances (Optional but Recommended)
If you're migrating from a previous system or spreadsheet, you may want to enter opening balances.
General Ledger Opening Balances:
General Ledger > Opening Balance
You’ll need:
• Balance Sheet values as of your start date
• Individual customer & supplier outstanding amounts
• Inventory quantities and value
✅ Tip: Always double-check that your total debits = total credits before proceeding.
📌 Final Checklist Before Going Live
✔️ Software installed and working
✔️ Company database created
✔️ Chart of Accounts customized
✔️ Users added and permissions assigned
✔️ Customers, Suppliers, and Inventory entered
✔️ Opening balances imported (if applicable)
Once all is set, you're ready to start entering invoices, purchases, payments, and generate reports.
Final Thoughts
Setting up SQL Account correctly from day one ensures a solid foundation for your financial management. While it may take a bit of time upfront, the long-term benefits in accuracy, compliance, and reporting are well worth it.
If you're unsure about advanced configurations (such as SST setup or multi-branch management), consider working with a certified SQL Account consultant or reseller.
FAQs
Do I need to install SQL Server separately to use SQL Account?
No, you don’t have to install it separately. SQL Account’s installer can automatically install SQL Server Express during setup if it's not already installed. However, for larger networks or multi-user setups, SQL Server Standard is recommended.
Can I create more than one company in SQL Account?
Yes. You can create and manage multiple company databases within the same software installation. Each company operates independently and can have different fiscal years and settings.
Can I add multiple users with different access levels?
Yes. SQL Account includes a built-in user management system where you can define roles and access permissions for each module (Sales, Purchases, GL, etc.).
Chris Business Solution Sdn Bhd (1118226-W)
© Copyright 2025. Chirs Business Solution Sdn Bhd. All rights reserved.
About
Solutions
Others
Resources
Connect With Us

Address: No. 29-1 & 31-1 & 33-1, Jalan Raja Uda, Pusat Perniagaan Raja Uda, 12300 Butterworth, Pulau Pinang.
Phone: +604 - 313 7197